> ## Documentation Index
> Fetch the complete documentation index at: https://docs.valuez.ai/llms.txt
> Use this file to discover all available pages before exploring further.
# Quickstart
> Create your first AI voice agent and make a live test call in under 5 minutes.
This guide walks you through creating your first AI voice agent on Valuez AI and triggering a test call. You'll be live in under 5 minutes.
***
## Step 1 - Sign Up and Log In
1. Go to [app.valuez.ai](https://app.valuez.ai)
2. Create a new account or log in to your existing one
3. You'll land on the main dashboard
***
## Step 2 - Create Your First Agent
From the dashboard, click **"AI Agents"** in the left sidebar, then click **"Create Agent"**.
A popup appears with two options:
Pick from pre-built agents for IT, Ecommerce, Agriculture, Fintech, Edtech, and more. Fields are pre-filled — just review and adjust.
Build a fully custom agent with a blank form. You define every field from scratch.
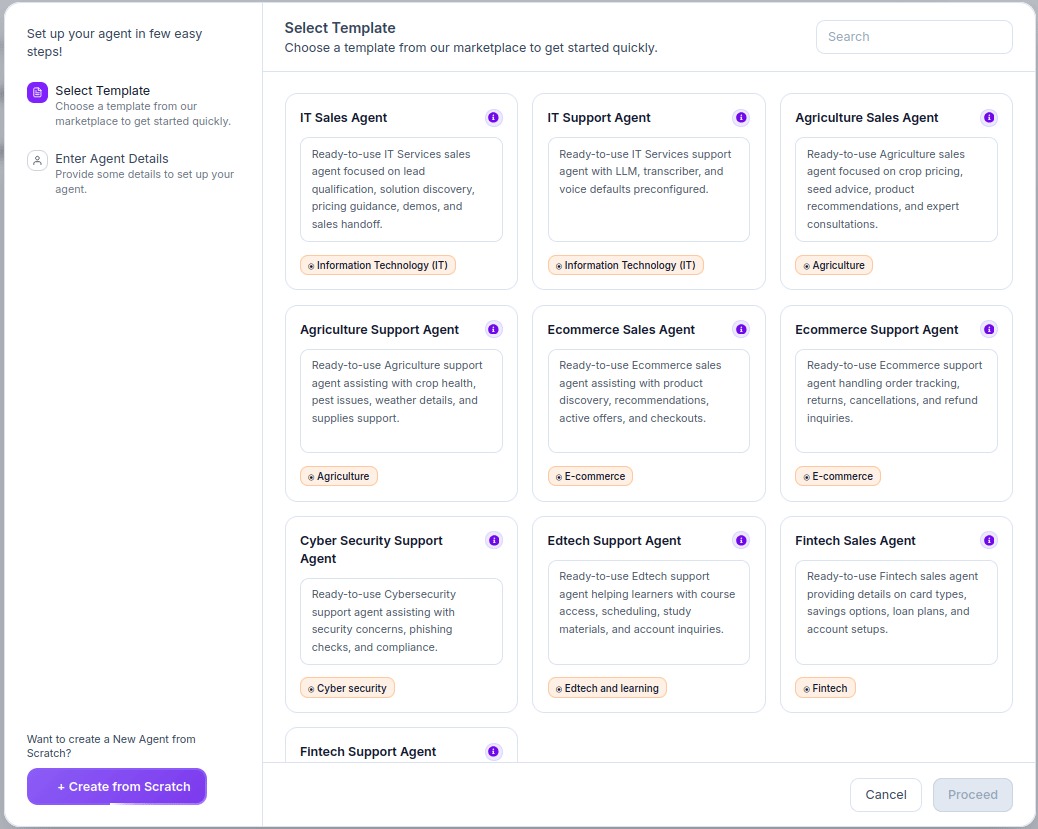 Select a template or click **"+ Create from Scratch"**, fill in the details form, and click **"Create Agent →"** to finish.
Starting with a template is faster for your first agent. For a full breakdown of every field and both creation paths, see [Agents](/agents).
***
## Step 3 - Configure Your Agent
Click on your newly created agent to open its configuration. Complete all six sections under **Basic Details**:
| Section | What to Configure |
| ----------------- | ------------------------------------------------ |
| **Agent Details** | Name, tone, language, region, timezone, industry |
| **LLM Model** | AI provider, model, response style and length |
| **System Prompt** | Full behavior instructions for your agent |
| **Conversation** | Greeting and ending messages |
| **Voice** | Voice provider, model, and speech rate |
| **Transcriber** | Speech-to-text provider and model |
Click **"Save & Next"** after each section and aim for **100% on the Setup Progress bar** before going live.
For a full explanation of every setting, see [Agents](/agents).
***
## Step 4 - Train Your Agent
Click the **"Train Your AI"** tab at the top to connect a Knowledge Base to your agent.
Upload your FAQs, product information, pricing details, and support documentation so your agent answers using your actual business content rather than guessing.
For full details on uploading and managing training data, see [Knowledge Base](/knowledge-base).
***
## Step 5 - Test Your Agent
Once Basic Details and Train Your AI are both complete:
1. Click the **"Test Your AI"** tab at the top
2. Speak naturally and verify the agent responds correctly
3. Review the call transcript after the call ends
Test at least 3 different scenarios before going live - a common question, an edge case, and something your agent doesn't know the answer to. The fallback behavior is especially important to verify.
***
## Step 6 - Go Live
Once your test call passes:
1. Assign a phone number to your agent for inbound calls, or
2. Trigger outbound calls via the dashboard
3. Monitor performance from your [Dashboard](/dashboard-overview)
API endpoint details for triggering calls programmatically will be added here once the API documentation is finalized.
***
## Next Steps
Deep dive into every agent configuration option - LLM model, system prompt, voice, and transcriber settings.
Upload documents and FAQs so your agent answers accurately using your own business content.
Connect a phone number and start handling incoming customer calls automatically.
Monitor call performance, agent activity, and customer engagement from your dashboard.
Select a template or click **"+ Create from Scratch"**, fill in the details form, and click **"Create Agent →"** to finish.
Starting with a template is faster for your first agent. For a full breakdown of every field and both creation paths, see [Agents](/agents).
***
## Step 3 - Configure Your Agent
Click on your newly created agent to open its configuration. Complete all six sections under **Basic Details**:
| Section | What to Configure |
| ----------------- | ------------------------------------------------ |
| **Agent Details** | Name, tone, language, region, timezone, industry |
| **LLM Model** | AI provider, model, response style and length |
| **System Prompt** | Full behavior instructions for your agent |
| **Conversation** | Greeting and ending messages |
| **Voice** | Voice provider, model, and speech rate |
| **Transcriber** | Speech-to-text provider and model |
Click **"Save & Next"** after each section and aim for **100% on the Setup Progress bar** before going live.
For a full explanation of every setting, see [Agents](/agents).
***
## Step 4 - Train Your Agent
Click the **"Train Your AI"** tab at the top to connect a Knowledge Base to your agent.
Upload your FAQs, product information, pricing details, and support documentation so your agent answers using your actual business content rather than guessing.
For full details on uploading and managing training data, see [Knowledge Base](/knowledge-base).
***
## Step 5 - Test Your Agent
Once Basic Details and Train Your AI are both complete:
1. Click the **"Test Your AI"** tab at the top
2. Speak naturally and verify the agent responds correctly
3. Review the call transcript after the call ends
Test at least 3 different scenarios before going live - a common question, an edge case, and something your agent doesn't know the answer to. The fallback behavior is especially important to verify.
***
## Step 6 - Go Live
Once your test call passes:
1. Assign a phone number to your agent for inbound calls, or
2. Trigger outbound calls via the dashboard
3. Monitor performance from your [Dashboard](/dashboard-overview)
API endpoint details for triggering calls programmatically will be added here once the API documentation is finalized.
***
## Next Steps
Deep dive into every agent configuration option - LLM model, system prompt, voice, and transcriber settings.
Upload documents and FAQs so your agent answers accurately using your own business content.
Connect a phone number and start handling incoming customer calls automatically.
Monitor call performance, agent activity, and customer engagement from your dashboard.