> ## Documentation Index
> Fetch the complete documentation index at: https://docs.valuez.ai/llms.txt
> Use this file to discover all available pages before exploring further.
# Team Management
> Invite team members and control which AI agents each person can access.
Team Management lets you invite colleagues into your Valuez AI workspace and assign them access to specific AI agents. Each team member only sees the agents they are permitted to - keeping your workspace organized and secure as your team grows.
Click **Team Management** in the left sidebar to open the screen.
***
## The Team Management Screen
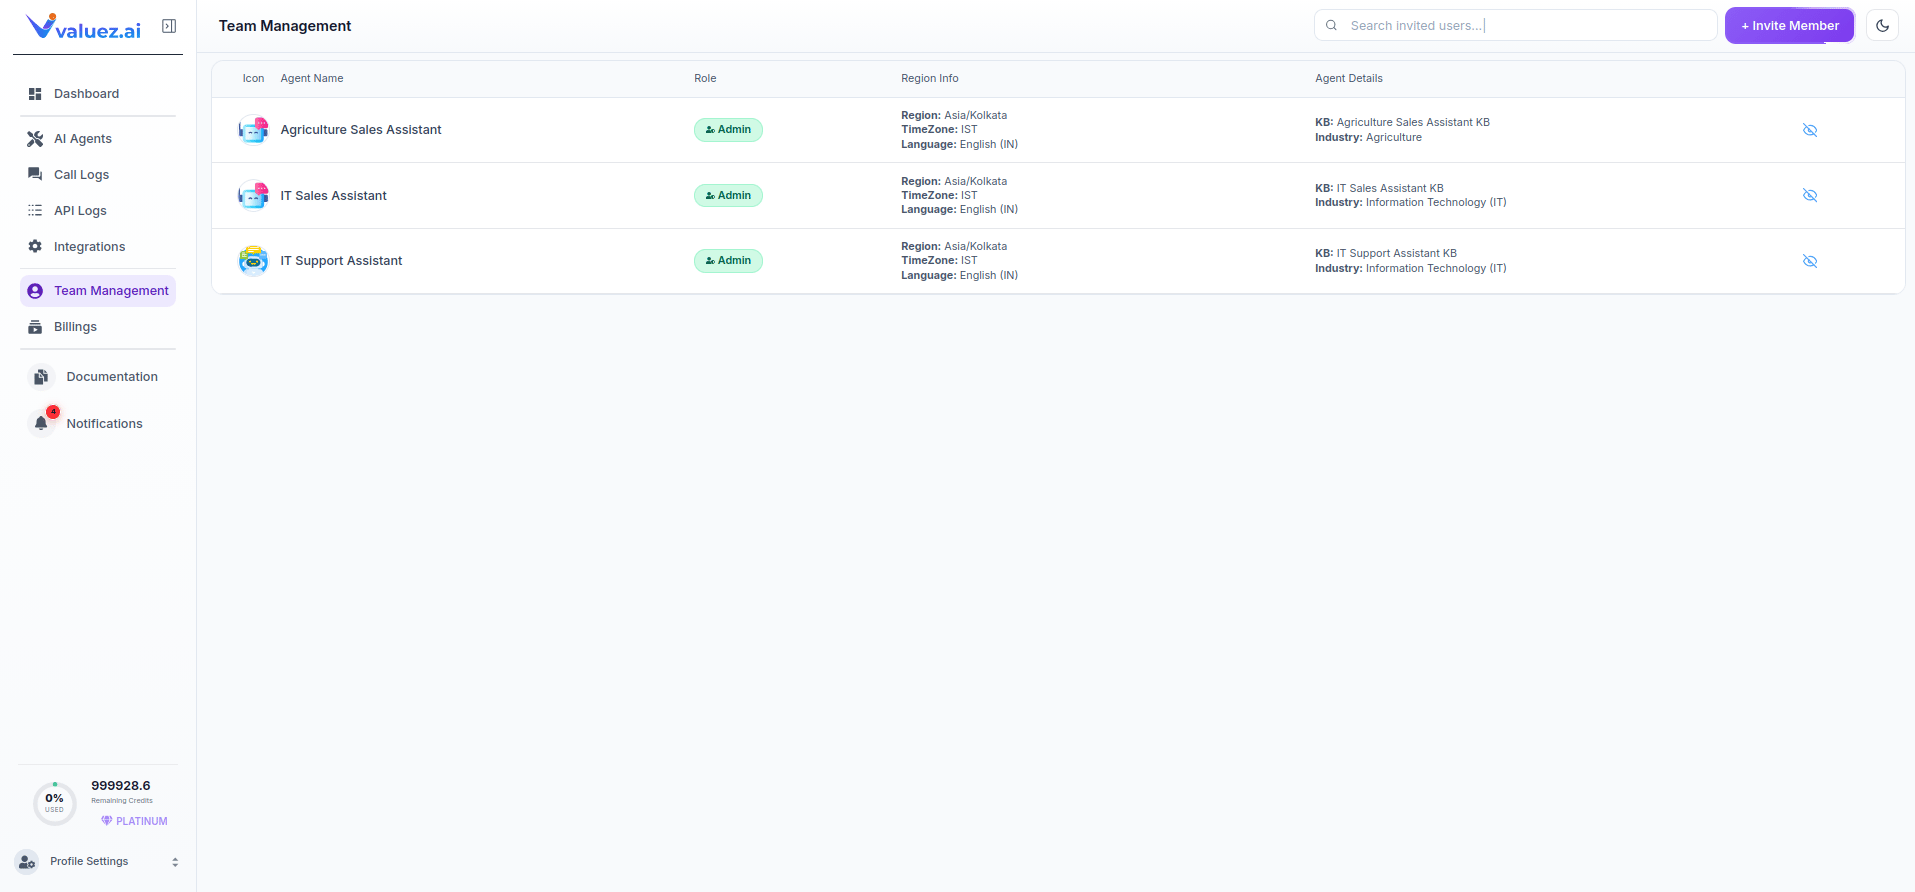 The screen lists all your AI agents. For each agent, you can see:
| Column | What It Shows |
| ----------------- | ------------------------------------------------------------------------ |
| **Icon** | The avatar assigned to this agent |
| **Agent Name** | The name of the AI agent |
| **Role** | The access role for this agent - currently `Admin` for the account owner |
| **Region Info** | The agent's configured region, time zone, and language |
| **Agent Details** | The Knowledge Base linked to this agent and its industry |
| **Eye icon** | Toggle to expand or collapse the team members list for that agent |
***
## Expanding Agent Access
Click the **eye icon** on the right side of any agent row to expand it and view the team members who have access to that agent.
The screen lists all your AI agents. For each agent, you can see:
| Column | What It Shows |
| ----------------- | ------------------------------------------------------------------------ |
| **Icon** | The avatar assigned to this agent |
| **Agent Name** | The name of the AI agent |
| **Role** | The access role for this agent - currently `Admin` for the account owner |
| **Region Info** | The agent's configured region, time zone, and language |
| **Agent Details** | The Knowledge Base linked to this agent and its industry |
| **Eye icon** | Toggle to expand or collapse the team members list for that agent |
***
## Expanding Agent Access
Click the **eye icon** on the right side of any agent row to expand it and view the team members who have access to that agent.
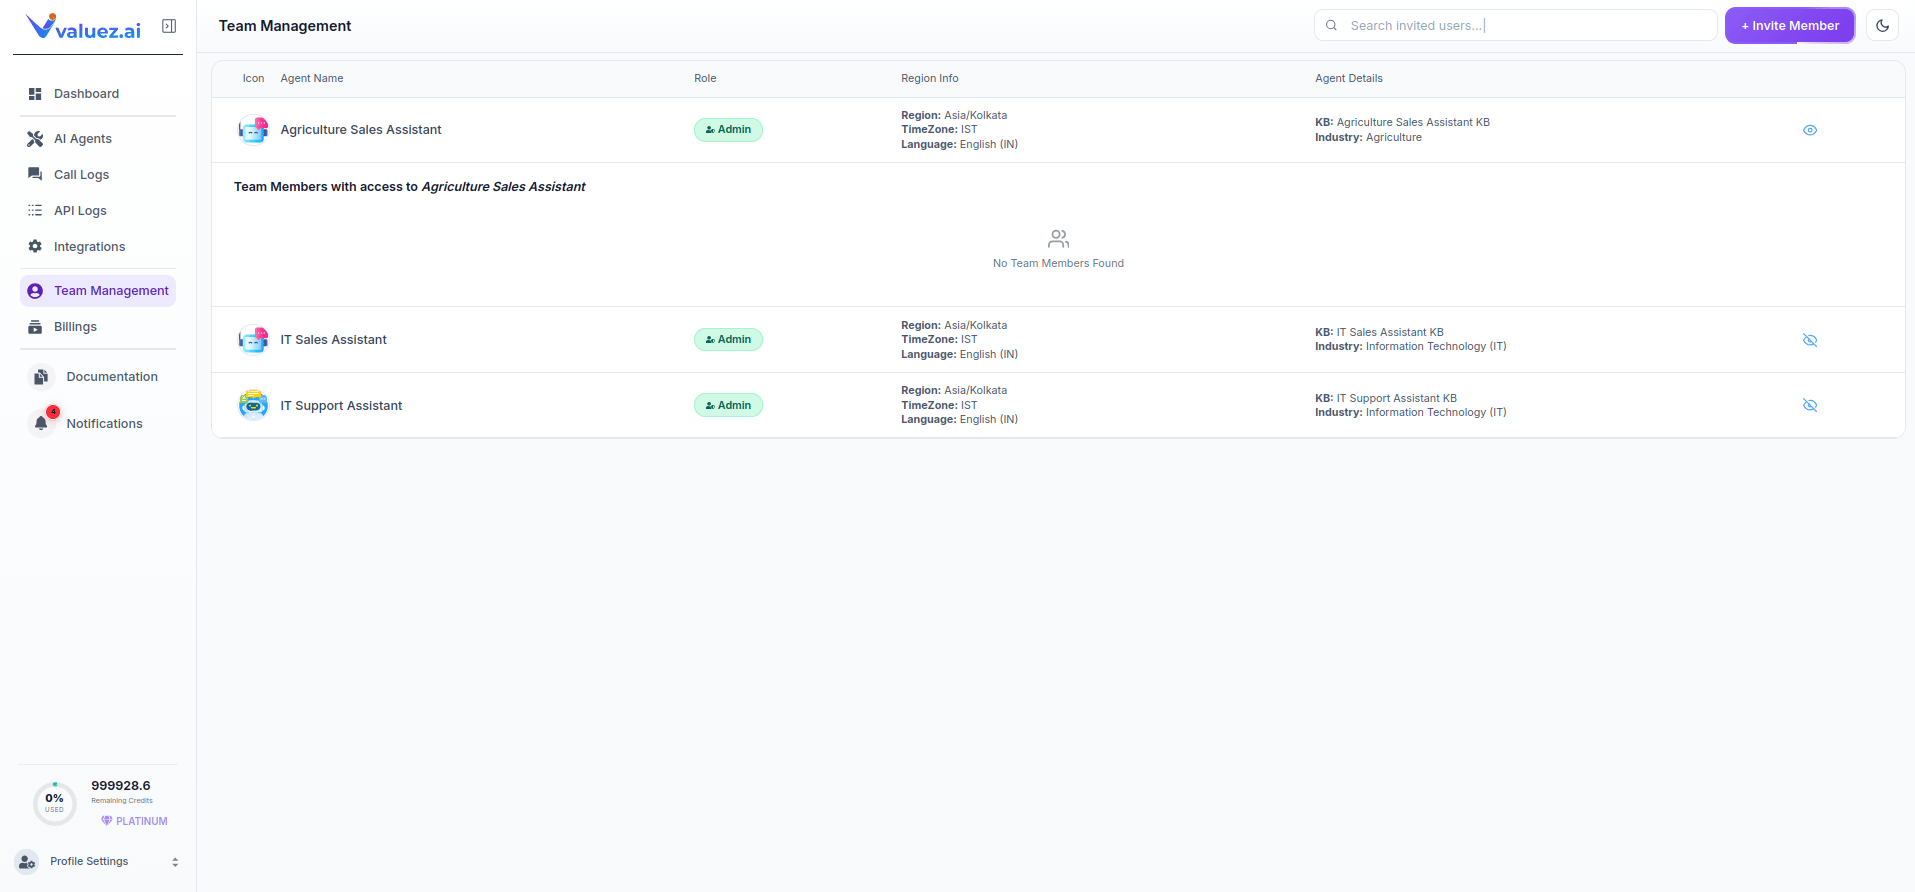 When expanded, you will see a **Team Members with access to \[Agent Name]** section below the agent row. If no team members have been added yet, it will show **No Team Members Found**.
***
## Inviting a Team Member
Click the purple **+ Invite Member** button at the top right of the screen.
Enter the email address of the person you want to invite. They will receive an email invitation to join your workspace.
Select which agents this team member should have access to. They will only be able to view and interact with the agents you assign to them.
Click Send. The team member receives an email with a link to accept the invitation and set up their account.
Use the **Search invited users** bar at the top right to find a specific team member if you have a large team.
***
## Understanding Roles
| Role | What They Can Do |
| ---------- | ------------------------------------------------------------------------------------------------------ |
| **Admin** | Full access to all agents, settings, billing, and team management - this is the account owner |
| **Member** | Access only to the specific agents they have been assigned - cannot access billing or account settings |
Currently only the Admin role is shown because no additional team members have been invited. Once you invite members, their role will appear in this column.
***
## Agent Details Column
The Agent Details column on the right of each row shows two pieces of information:
* **KB** - the name of the Knowledge Base linked to this agent, confirming which training data it uses
* **Industry** - the industry this agent is configured for
This gives you a quick reference view of all your agents' configurations without needing to open each one individually.
***
## Best Practices
Give team members access to agents relevant to their job function. A support team member should only have access to support agents — not sales agents — to keep data visibility appropriate.
When someone leaves your organization, remove their access immediately from Team Management to prevent unauthorized access to your agent data and conversation logs.
Since team members only see the agents assigned to them, clear agent names — like `Customer Support Agent` or `Sales Outbound Bot` — help them understand their access without needing explanation.
***
## Related Pages
View and configure the agents you are assigning team members to.
Learn about workspace security, session management, and access control.
Connect agents to external systems - integrations are managed separately from team access.
Stay informed about team activity and platform events.
When expanded, you will see a **Team Members with access to \[Agent Name]** section below the agent row. If no team members have been added yet, it will show **No Team Members Found**.
***
## Inviting a Team Member
Click the purple **+ Invite Member** button at the top right of the screen.
Enter the email address of the person you want to invite. They will receive an email invitation to join your workspace.
Select which agents this team member should have access to. They will only be able to view and interact with the agents you assign to them.
Click Send. The team member receives an email with a link to accept the invitation and set up their account.
Use the **Search invited users** bar at the top right to find a specific team member if you have a large team.
***
## Understanding Roles
| Role | What They Can Do |
| ---------- | ------------------------------------------------------------------------------------------------------ |
| **Admin** | Full access to all agents, settings, billing, and team management - this is the account owner |
| **Member** | Access only to the specific agents they have been assigned - cannot access billing or account settings |
Currently only the Admin role is shown because no additional team members have been invited. Once you invite members, their role will appear in this column.
***
## Agent Details Column
The Agent Details column on the right of each row shows two pieces of information:
* **KB** - the name of the Knowledge Base linked to this agent, confirming which training data it uses
* **Industry** - the industry this agent is configured for
This gives you a quick reference view of all your agents' configurations without needing to open each one individually.
***
## Best Practices
Give team members access to agents relevant to their job function. A support team member should only have access to support agents — not sales agents — to keep data visibility appropriate.
When someone leaves your organization, remove their access immediately from Team Management to prevent unauthorized access to your agent data and conversation logs.
Since team members only see the agents assigned to them, clear agent names — like `Customer Support Agent` or `Sales Outbound Bot` — help them understand their access without needing explanation.
***
## Related Pages
View and configure the agents you are assigning team members to.
Learn about workspace security, session management, and access control.
Connect agents to external systems - integrations are managed separately from team access.
Stay informed about team activity and platform events.